Showing posts with label Easter. Show all posts

Saturday, April 23, 2011

No Bake Cookie Nests

Pin It I've seem many different versions of cookie/dessert nests out there.  Last night I had a craving for no bake cookies and decided to make some nests of my own.  All I did was use a spoon to form the nest shape and once they were cooled, I added some jelly beans.  Pretty darn simple - and yummy!

 
I hope you all have a Happy Easter!

Friday, April 15, 2011

Easter Dress From A Shirt

Pin It
My mom was cleaning out her closet when she saw a shirt that she thought I would like to revamp into something for my daughter.  I'm so glad she saved it!  I've been holding onto it for a couple of months since I thought it would make the cutest little spring dress.  My family has a tradition of getting an Easter dress each year.  Rather than buying one for for my daughter, I decided to use my mom's old shirt.  Here's what I did:
This is what the shirt used to look like (I started to cut it up and then realized I hadn't taken a picture of it yet, so I put it back together for this shot ha)

Here are the different pieces I cut the shirt into.  I had to unpick the little pleats that were on the front of the shirt.  I sewed the two large pieces together on one side. 
 I and wound my bobbin with elastic thread.
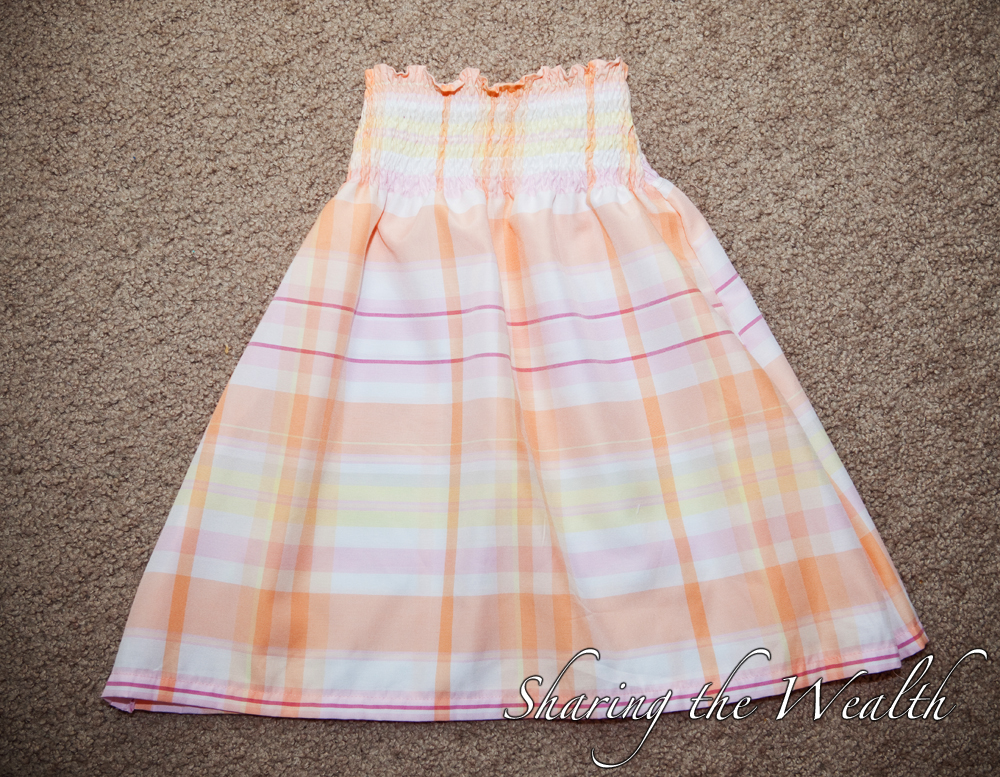
 I sewed several rows with the elastic thread (only the bobbin is the elastic thread, you use normal thread on the top).  I then sewed the other side together,  to get this.  I could have made a pretty cute skirt too hu?
 I then added sleeves - since my daughter was down for a nap when I was making this, I wasn't able to measure....and when I tried it on her, the sleeves were too small; her arms only fit in until her elbows haha.
 So I changed the sleeves - which I actually like better and added some little ruffles on the outside.
 The finished product on my darling model.

Sorry I didn't take more step by step pictures.  I was trying to hurry and get it done while she was sleeping.  Please let me know if you have any questions!

Monday, April 4, 2011

Jello Eggs

Pin It I remember my 5th grade teacher giving us Jell-o in the shape of eggs and I thought it was sooooo cool.  I decided to try and make some of my own.  Now, let me say - they are not perfect and they are not very good to take pictures of, BUT they are fun and I'm sure kids would love them!

Here's what I did:

I made the Jello according to the "mold" instructions.
 Since the plastic eggs have two holes in them, I covered those with hot glue. You will also want to pull apart the eggs completely (don't have then connected at the side - that's how mine came) I then dipped the eggs under the jello and fill them all the way.  While they are still submerged, snap them shut.
 Rinse them under water to clean them off then store in an egg carton upside down.  You do it upside down so that if there are air bubbles, they will be at the bottom of the egg rather than the top.
 Warning: Your hands will get stained!
 Leave the Jello in the fridge for a few hours.  When it is done setting, take the eggs out and put them in warm/hot water for 30 seconds.  This helps you get them out of the mold
 I rinsed them under cold water and they were done.  Like I said - not super pretty to take pictures of (maybe it's just the colors I did) but they are fun!

Wednesday, March 30, 2011

Easter Topiary

Pin It

I bought some plastic Easter eggs at the dollar store the other day and wanted to figure out something fun to do with them.  I came up with this Easter topiary.  My husband said it looks like something from Dr. Seuss ha.  I think it's fun and considering it only cost me a dollar to make - I think it turned out pretty well.

Supplies:
- Plastic Eggs
- Wire hanger
- Basket
- Tissue paper
- Plain paper
- Plastic cup
- Hot glue
- Tacky glue - Elmer's glue would work fine too
- Wire cutters

Here's how you make it:

Just like with my Valentine's Kissing Ball, I made a ball out of plain paper. 
 I cut up some tissue paper into squares - don't worry if they aren't all perfect or the same size
 Take one square and put it on a pencil like the picture below.  Dip the bottom of the paper in glue (I used Tacky glue, but Elmer's would work too).
Before you glue on the tissue paper, make a hole in the ball where your wire will be glued inside.  Use the pencil to press the paper onto your ball. Put the pieces of tissue paper close together so there aren't any gaps. 
 The plastic eggs came with two holes - one at the top and one at the bottom, which are the perfect size for a wire hanger to be "threaded" through.  I used wire cutters to cut up a hanger.  I then hot glued the wire hanger inside of my topiary.
 Lastly, I used a small plastic cup - since that's what I had lying around for the base of my topiary.  I hot glued the last egg to the bottom of the cup.  I put the topiary inside an Easter basket and used white tissue paper to fill the basket - I think some of that fake grass would be cute in the basket, I just didn't have any at the time.  Here is the finished product:

Tuesday, March 22, 2011

Cardboard Easter Sign

Pin It I made a quick Easter sign the other day using cardboard that I had lying around the house.  I wish I had a Cricut or a Silhouette machine so I could have cut out some cute letters to put on it, but instead I just painted on the letters quickly.  They aren't cute, but they get the point across :)  Here's what I did:

I made an Easter egg "stencil" that I traced onto the cardboard.  Then I cut out the sign.
 I then used my acrylic paints to paint the egg shapes.
 Lastly, I painted the word Easter along the eggs.  I didn't have to make a base because the cardboard actually curled a bit after painting so it stands on its own.