Showing posts with label Accessories. Show all posts

Friday, September 30, 2011

Vintage Earring Holder

Pin It

The other day I was trying to sort through all of my earrings.  When I finished finding the different pairs and deciding which ones I'd actually like to keep, I had nowhere to put them other than in a ziplock bag.  I decided right then and there that I was going to make something to organize my earrings.  I've had plenty of jewelry boxes in my day, but my earrings still didn't seem that organized in them.  I had seen some framed jewelry holders floating around the internet.  This one was my inspiration.  I loved the look of the lace. 

I kept my eye out for an oval frame....but I couldn't find any that were a very good price.  I headed to DI and found a long and skinny frame that I thought would work and it was only $3 (I actually ended up liking better than the oval frame look).  I had purchased some lace at Hobby Lobby.  The lace was 50% off so the two rolls cost me a total of $2.50.  I have lots of lace left over and look forward to using it for some other projects.  I just love lace!  Next I got some Ivory spray paint at Walmart for $3.50.  So that brings my total cost to $9, but I have plenty of lace and spray paint left over that I'll be able to use for other projects.

This is what the frame looked like to begin with.
 I spray painted the frame and then antiqued it a bit.
 Then I simply attached my lace.  I used hot glue because that's what I had, but if you have a staple gun, I'm sure that would be more secure.  The hot glue seems to be holding up just fine so far though.
 I hung it up on the wall and hung my earrings and it was done.  Such an easy, quick craft!

Monday, September 19, 2011

Little Boy Tie Tutorial

Pin It
Last week I learned how to make little boy ties and thought I'd share what I learned.  They are so easy and so cute!  Plus, it's one of the few crafts I can make for my little guy on the way.  I hope my step by step tutorial helps you out.  These are probably the size you'd want for a 1 1/2 - 2 year old.  If you want to make them for an older child, just make the pattern longer.  If you have any questions please ask!

Using the pattern found here, cut out your fabric.  You will need to cut two layers of fabric - one being the pattern you want to show for your tie and the other being a backing (this one will only show on the little corners in the back).

Put the right sides together and sew the corners together using a 1/4" seam allowance.
 Clip the fabric on the corners - making sure not to cut the actual seam.
 Flip the fabric right side out and iron the corners so they are nice and sharp.
 Fold the tie in half with right tie pattern sides together and sew down the edge.  Once again using the 1/4" seam allowance.  DON'T sew the corner ends, only the long edge.
 Press the seam open and then using a safety pin, flip the tie right side out again.  You do this by putting the safety pin on the corner and then feeding it down the hole on that same side.
Press your tie again so it's edges are nice and sharp.
 This is what the back of the tie looks like.
Cut a piece of fabric that is approximately 2 3/4" wide and 16" long.  Feel free to make this strip longer or shorter if you need to.  This is what will be going around the neck.  Put the right sides together and sew a straight line using a 1/4" seam allowance.
 Flip it right side out (again with the safety pin) and then press your fabric. with the seam being in the middle.
 Sew the ends shut - if you are wanting to do elastic for part of your neck piece, simply put it about 1/2" into the end and then sew your fabric shut.
 
 How to Tie the Tie

Place your tie like this around the neck piece.
Bring the back of the tie across the front.
 Pull the back piece up high so if looks like a normal tie not and then wrap it around to the back. (Look at the images - it will help a lot ha).
 Tuck the back of the tie through the front.
 Now move that little piece that is sticking out of the front to the back.  You just have to slide it around.  Tighten the knot by pulling on the neck piece. Using a needle and thread, stitch the little back piece to the second layer of the front piece, but only through that layer so it won't be seen from the front.  This will keep it from getting untied.
 And here is your tied tie.
 All you do after this step is add Velcro or snaps to the neck piece or whatever else you are wanting for your attachment. 

These are some ties I made for my little guy this weekend.  Aren't they so cute???

This are super easy to make and use very little fabric.  I would recommend getting about 1/4 of a yard - and you will definitely have some extra fabric with that.  You could maybe get by with 1/8 yard, but it would be close.

If you'd like to see my new tutorial on how to make clip-on bow ties go HERE


Wednesday, July 20, 2011

Shrink Plastic Buttons

Pin It I found this AMAZING tutorial on how to make Shrink Plastic Buttons on Scissors.Paper.Wok I will definitely be making some of these.  I just need to get a machine that will cut the pattern and some shrink plastic.  I can't wait!

Thursday, April 21, 2011

Faux Metal Heart Necklace

Pin It
My little sisters have some modeling clay.  I have seen people make many fun things out of clay, and I thought it would be fun to make a faux metal necklace.  I went with a heart because it's a simple shape :)

Here's what I did:

 This is what the clay looked like to begin with.  I rolled it out to about 1/4 inch thick.
I then used little scissors and my fingers to create a heart shape that I was happy with.
 I used a tooth pick to poke a hole in the heart.  I then baked the clay according the the instructions.  For this particular clay, it was baked at 275 degrees for 15-20 minutes.  I placed it on a pieced of paper while it was baking so it wouldn't be directly on the pan.  I read that this helps if from getting shiny on the bottom side.
I then painted my heart using acrylic paint.  I did a layer of black first and then used silver. 
 I threaded my hemp twine through the heart and I had a necklace.
 Pretty darn simple!

If you end up making some, I'd love to see the different shapes you come up with!

Monday, April 11, 2011

Twisty Tie Bird's Nest Necklace

Pin It
Bird's Nest Necklaces are definitely popular right now, but they can be fairly expensive.  I saw this tutorial the other day on A Law Student's Journey where she made a birds nest using twisty ties and thought it was an absolute genius idea!  I had to try it out for myself.  Here's what you do:

Using pliers or tweezers, Pull the wire out of some twisty ties.  I found it pretty easy once I cut the top a little so I could grab the wire part. 
 Once you have all of your wire's (I used 7 twisty ties), add 3 pearl beads to one wire.  Bring them to the center of the wire and then twist the wire so they stay in the position you want them. 
 Wrap wires around the beads, until you have the desired size of next.
 Add a necklace hoop and chain for to the nest to make it a necklace.  It seriously took me maybe 10 minutes to make.  So fast and easy!

Thursday, December 23, 2010

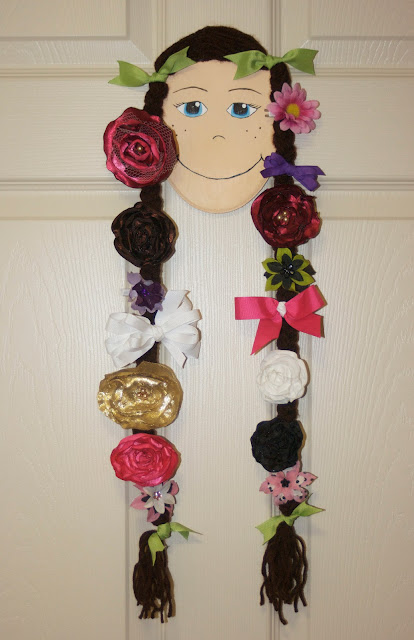
Cute Hair Clip Holder

Pin It I've been trying to think of a cute way to store all of my daughter's hair clips.  I eventually came up with this:


I started with a piece of wood I found at Walmart for 97 cents.


I drew a little face of the wood.


Then using my acrylic paints, I painted the face - don't worry she looks better with hair.


For the hair, I used brown yarn: $2.50 at Walmart.  I used a hot glue gun and attached each strand of yarn individually so I would get a nice part.  Before I started to braid the hair, I used some green ribbon I had on hand to tie the yarn together.


I braided the yarn and tied the ends with the green ribbon.


Then she was ready for the clips!


All the supplies I purchased only cost me about $3.50 since I had most of the other supplies on hand.  I'm pretty pleased with her and am happy that I won't have all these clips just sitting in a bag getting mushed.

Monday, December 20, 2010

Flowered Beanies

Pin It With the weather outside getting cold, I decided I needed to get some beanies for my daughter.  There are plenty of cute beanies out there, but all of the really cute ones are about $10 sometimes more - SO I took matters into my own hands and decided to make simple $1 beanies from the dollar store cute.  I followed a tutorial from Delia Creates where she added a brim to a beanie for her son.  It was really super easy!  So the beanie didn't look too boyish, I added a flower.

Before
 After
 My cute little model
 Another beanie I got from the dollar store.  I didn't do a brim on this one, but I did add the flower.
 Love her!